
Making a Minecraft WOLF.
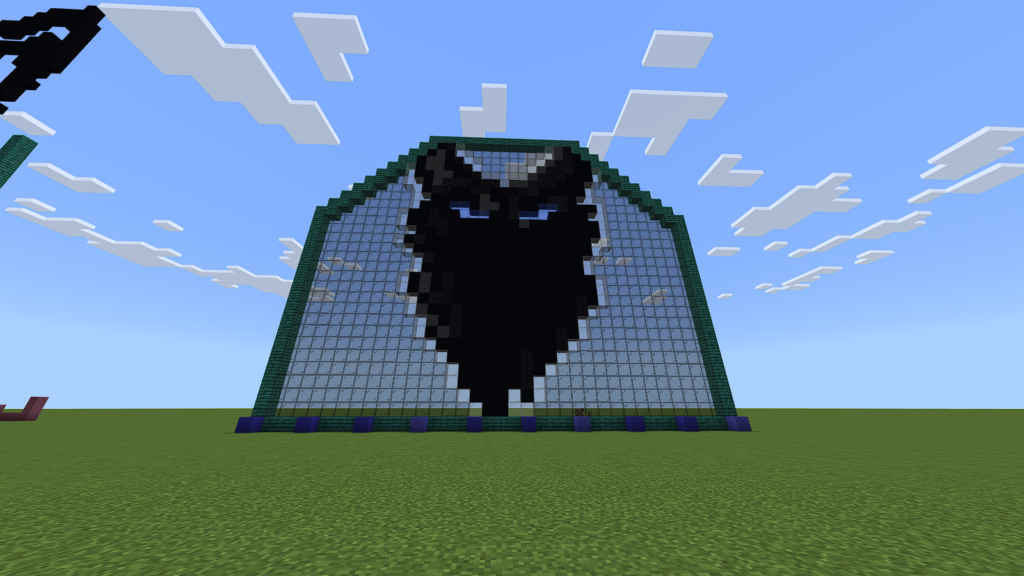
The Wolf
Need a good, play it safe design that looks epic and can impress all your friends? Follow these simple steps to create your own masterpiece. If it looks daunting, trust me, it’s really simple if you follow the steps. Try it out.
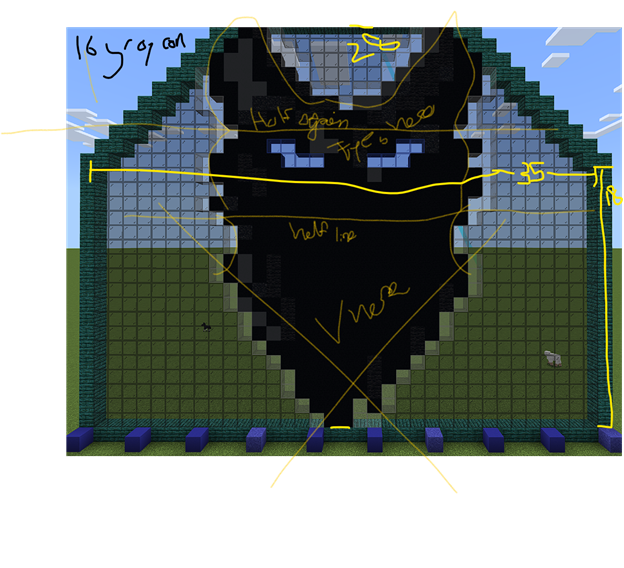
Alright, so, start with dividing your workspace in two horizontally. Cut the top half in half again. The top quarter is going to be your ears that have a ‘valley’ that practically touches the end of their bounds. The next lower quadrant is going to be the eyes. The lowest half is allocated to being the neck.
Choose your color. Depending on what your plan to do with your wolf, you may want to choose different colors. Like the eyes, I selected blue stained glass because it went well with the castle that I was making it for. The blue nether wood in this picture is not significant. Note, if you choose a different color, you may need to find a suitable color pattern for it. Coincidentally, black has a lot of grays and similar colors. BUT, if you chose to make your wolf neon pink, then you may have a hard time creating that needed distinction with only a couple colors close to pink.
First, make the V for the neck. This is just a silhouette, so we have no definition. Once you have created your V, carve out a small percentage to make a small curve where our wolf’s neck becomes his head. Just a gentle rut back inward. ) (. Kind of like that.
Next, take your third quadrant and bow it gently outward. This is critical to the look of your wolf. If you come too far in, then your wolf will look more like an arrowhead. Too far outward, and he might just look like a cartoon dog.
Finally, create the ears. This can be challenging but finding that perfect curve is possibly the most important thing to do. If you round your ears, your wolf will look like a bear, which is fine too. Make your design any way you like it. Or, if you have no ears, you could make a snake, better yet, with some thin shards instead of ears, you could make a viper.
After you have the outline down you can begin to fill in. If you aren’t completely satisfied with your outline result, tweak it a little. Go over the steps again, analyze the picture and see where we differ. Sometimes with less blocks than I have, it can be a challenge to fit everything in. If you are too small and can’t get all the blocks in, try a different approach, maybe you can use banners or stairs to help your design look better. Be creative and remember, it is all for fun. If you really, really can’t get it, no big deal. Take some TNT to it and go explosive.
Filling in can be the most exciting and fulfilling part of the process of creating your own wolf. Seeing your shadow come to life is one of the best things. Begin to fill it in with your choice of material. Remember, our wolf is going to be made of a solid material, while the outside, everything else, is going to be glass. Or vice versa if you chose.
If you are in survival and doing this in the air. It is going to be hard. I had a hard time with this myself. Getting where you want to be, with the blocks you want is extremely difficult. Scaffolds can be helpful.
Once you have completely filled in your outline, you need to work on the shading. If shading and art aren’t your things and never has been, don’t worry. It is simple and easy to do.
So, image it like this, you need to find a light source for your picture. In my photo, my light source is in the left. So, you can see the interior of the left ear, but not the right ear. Instead on the right ear, we have a couple of light-colored blocks. These create the allusion of roundedness. To make it simple, just make the lightest part of the ear on the right, on the right and the darkest part on the left of the right ear. If this still illudes you, just try and copy what I did.
Next, we want some shading, light shading, around the eyes. If your color palette doesn’t have any similar colors, skip this step because yours will look strangely with high contrast lines.
Finally, at the base of the neck, add some simple, small ridges that give the look of fur.
When you are done with all of this, just step back and look at it. If your image doesn’t have that look you wanted, try and figure out what is wrong and retry or modify. This was not my first attempt, and it took me more than one try also.
Well, I hope this works for you.
